
Exploring Light & Shadow: Create Your Own DIY Sundial For Primary Science Learning
December 12, 2025
Energy Conversion Project: How to Build a Rubber Band Car – Complete Tutorial
December 14, 2025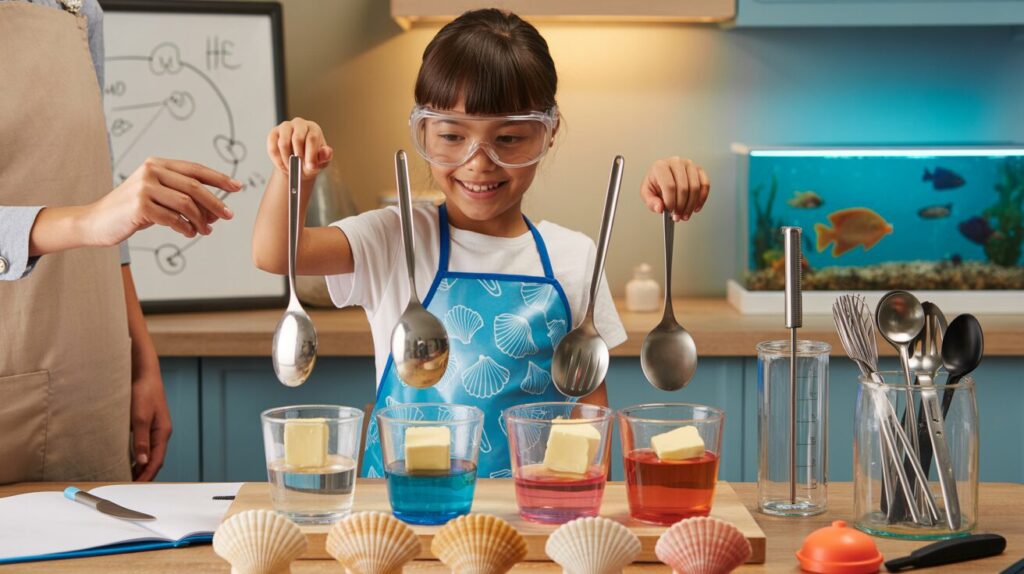
Table Of Contents
- Introduction to Heat Transfer Learning
- Understanding Heat Transfer: Basic Principles
- Setting Up Your Kitchen Laboratory
- Experiment 1: Metal Spoon Heat Conductors
- Experiment 2: Convection Currents in a Cup
- Experiment 3: The Radiating Toaster
- Experiment 4: Ice Cube Race on Different Materials
- Experiment 5: Colorful Convection Currents
- Learning Outcomes and PSLE Application
- Safety Considerations
- Conclusion
Have you ever wondered why metal spoons heat up quickly in hot soup while plastic ones stay cool? Or why ice cubes melt faster on metal than on wood? These everyday kitchen observations actually demonstrate powerful scientific principles that form the foundation of physics and chemistry. At Seashell Academy by Suntown Education Centre, we believe that science learning thrives when students connect classroom concepts to real-world experiences.
Heat transfer represents one of the most accessible yet fascinating areas of physical science for primary school students. By transforming your kitchen into a laboratory and ordinary utensils into scientific instruments, parents and children can explore the wonders of thermal energy together. These hands-on experiments not only reinforce PSLE science concepts but also nurture the curiosity and critical thinking skills that are central to our Seashell Method.
In this comprehensive guide, we’ll explore five engaging heat transfer experiments using common kitchen utensils that demonstrate conduction, convection, and radiation. Each experiment includes simple materials, clear instructions, and explanations of the scientific principles at work – perfectly aligned with the primary school science curriculum while making learning a joyful discovery process.
Understanding Heat Transfer: Basic Principles
Before diving into our kitchen experiments, it’s important for young scientists to understand the three fundamental ways that heat energy moves from one place to another. These principles appear throughout the primary science curriculum and feature prominently in PSLE examinations.
Conduction: Heat Through Contact
Conduction occurs when heat travels through solid objects that are in direct contact with each other. Think about placing a metal spoon in hot soup – the handle gradually warms up even though it’s not directly in the soup. This happens because heat energy transfers from molecule to molecule throughout the metal.
Different materials conduct heat at different rates. Metals are generally excellent conductors (they transfer heat quickly), while materials like wood, plastic, and air are poor conductors, or insulators. Understanding these properties helps us make smart choices about which utensils to use for different cooking tasks.
Convection: Heat Through Fluid Movement
Convection is how heat travels through liquids and gases (collectively called fluids). When a fluid is heated, it becomes less dense and rises, while cooler, denser fluid sinks to take its place. This creates a circular movement called a convection current.
We experience convection every day when boiling water for tea, warming soup in a pot, or even feeling a breeze created by the different temperatures in a room. This principle explains why the top floor of buildings often feels warmer than the ground floor – heat rises through convection!
Radiation: Heat Through Space
Unlike conduction and convection, radiation doesn’t need any matter to transfer heat. Instead, heat travels as electromagnetic waves that can move through empty space. The most familiar example is the warmth we feel from sunlight, which travels millions of kilometers through the vacuum of space before reaching Earth.
In the kitchen, we experience radiation when we feel the heat coming from a toaster, microwave, or the glowing elements of an electric stove. Understanding radiation helps explain why we feel warm even when not directly touching a heat source.
Setting Up Your Kitchen Laboratory
Creating a safe, organized space for scientific exploration is the first step in successful experimentation. At Seashell Academy by Suntown Education Centre, we emphasize that good scientists are methodical and prepared. Here’s how to transform your kitchen into a learning laboratory:
First, clear a dedicated workspace with good lighting and ventilation. Cover the area with newspapers or a plastic tablecloth for easy cleanup. Gather basic measurement tools like a kitchen timer, thermometer, measuring cups, and a ruler. Keep a science notebook nearby for recording observations, questions, and conclusions – documentation is a key scientific skill we nurture in our Mathematics Programme.
Most importantly, review safety rules with your child before beginning. Some experiments involve hot water or appliances, so adult supervision is essential. Wearing safety goggles and heat-resistant gloves can add to the authentic scientific experience while ensuring safety.
Remember, the scientific method involves asking questions, making predictions, testing ideas, and analyzing results. Encourage your child to hypothesize about what might happen in each experiment before starting. This approach mirrors our Programme Philosophy of building critical thinking alongside content knowledge.
Experiment 1: Metal Spoon Heat Conductors
Materials needed:
- Metal spoons (stainless steel, aluminum, silver if available)
- Plastic and wooden spoons
- Hot water (not boiling)
- Large cup or mug
- Stopwatch or timer
- Thermometer (optional)
Experiment procedure:
Fill a large mug with hot (but not boiling) water. Place different types of spoons in the water at the same time, arranging them so their handles extend over the edge of the mug. Wait 30 seconds, then carefully touch the handles of each spoon. Record which spoons feel warmest and which remain cool.
For a more quantitative experiment, use a thermometer to measure the temperature of each handle at 30-second intervals for several minutes. Create a simple graph showing how quickly each material conducts heat.
Science explanation:
This experiment beautifully demonstrates thermal conduction. The metal spoons feel warmer because metals are excellent conductors of heat. The thermal energy from the hot water transfers efficiently through the metal molecules to the handle. Plastic and wooden spoons, being insulators, conduct heat poorly, so their handles remain relatively cool.
If testing different metals, students might notice that silver and copper conduct heat faster than stainless steel or aluminum. This property explains why professional cooking equipment often features copper bottoms with stainless steel handles—combining excellent heat distribution with comfortable handling.
When discussing this experiment with your child, ask them to connect this to everyday experiences: Why do we choose wooden spoons for stirring hot soups? Why do pot handles often have plastic or wooden grips? These connections between science and daily life are central to the Seashell Academy learning approach.
Experiment 2: Convection Currents in a Cup
Materials needed:
- Clear glass cup or mug
- Cold water
- Food coloring (preferably red or blue)
- Hot water
- Small container
- Dropper or teaspoon
Experiment procedure:
Fill a clear glass cup with cold water. In a separate container, mix hot water with a few drops of food coloring. Using a dropper or carefully pouring with a teaspoon, add the colored hot water to the side of the cold water cup.
Watch closely as the colored water creates visible currents in the cup. The hot colored water will rise to the top and gradually spread throughout the container. Have your child sketch the patterns they observe at 30-second intervals.
Science explanation:
This mesmerizing experiment demonstrates convection currents in action. The hot colored water is less dense than the cold water, causing it to rise to the top. As it spreads and cools, it eventually becomes dense enough to sink, creating a circular flow pattern.
Convection currents play crucial roles in our daily lives, from weather patterns and ocean currents to home heating systems and cooking. When we boil pasta, convection ensures that water circulates throughout the pot, cooking the pasta evenly.
For an extended learning opportunity, discuss how convection affects weather. Warm air rises and cool air sinks, creating wind patterns. This same principle applies to ocean currents that distribute heat around the planet. These real-world applications help students see the relevance of scientific principles beyond the classroom, a key aspect of our Programme Philosophy.
Experiment 3: The Radiating Toaster
Materials needed:
- Toaster
- Small pieces of plain paper
- Ruler
- Thermometer (optional)
Experiment procedure:
Place the toaster on a heat-safe surface and turn it on (without inserting bread). Hold your hand near the toaster (at a safe distance to avoid burns) and observe how you can feel the heat even without touching the appliance.
For a measurable experiment, place small pieces of paper at increasing distances from the toaster (5cm, 10cm, 15cm, etc.). Observe how quickly each piece warms up based on its distance from the heat source. If you have a thermometer, you can measure the air temperature at each distance point.
Science explanation:
This experiment demonstrates heat transfer through radiation. The toaster’s heating elements emit infrared radiation that travels through the air in straight lines. Unlike conduction or convection, radiation doesn’t require a medium to transfer energy—it can travel through empty space.
The papers closest to the toaster warm up faster because radiation intensity decreases with distance. This principle explains why we feel warmer standing close to a fire than farther away, and why Earth receives less solar energy than Mercury despite the sun radiating energy in all directions.
When discussing this experiment, connect it to everyday experiences with radiation: feeling the sun’s warmth on your skin, using a microwave to heat food, or sensing heat from a light bulb. These connections help students understand that radiation isn’t just an abstract concept but a phenomenon they experience regularly.
Experiment 4: Ice Cube Race on Different Materials
Materials needed:
- Ice cubes (all the same size)
- Metal tray or plate
- Wooden cutting board
- Plastic plate
- Ceramic plate
- Stopwatch
- Paper towels
Experiment procedure:
Place different materials (metal, wood, plastic, ceramic) side by side on a flat surface. Ensure all materials are at room temperature. Put an identical ice cube on each surface simultaneously and start your timer.
Observe which ice cube melts fastest and which melts slowest. Record the complete melting time for each ice cube. For greater accuracy, you can take photos at one-minute intervals to document the melting process.
Science explanation:
This experiment provides a dramatic demonstration of how different materials conduct heat. The ice cube on the metal surface will likely melt first because metals are excellent conductors. They efficiently transfer heat from the room-temperature air to the ice cube, causing faster melting.
Wood, being a good insulator, conducts heat poorly. The ice cube on the wooden surface will melt more slowly because less heat transfers from the air through the wood to the ice. Plastic and ceramic fall somewhere in between.
This experiment connects to important real-world applications. We use metal pots for cooking because they transfer heat quickly and evenly. We choose wooden or plastic handles because they insulate, preventing burns. Insulating materials like wood and plastic are used in home construction to reduce heat transfer and improve energy efficiency.
Encourage your child to think about other examples of conduction in daily life: Why do we use pot holders? Why do thermos flasks have double walls? These practical applications reinforce the science and demonstrate its relevance, a key aspect of learning at Seashell Academy.
Experiment 5: Colorful Convection Currents
Materials needed:
- Two identical clear glass jars or containers
- Hot and cold water
- Food coloring (two different colors)
- Index card or thin cardboard
- Small tray (to catch spills)
Experiment procedure:
Fill one jar with hot water and add several drops of one color food coloring (e.g., red). Fill the second jar with cold water and add several drops of a different color food coloring (e.g., blue). Place the index card on top of the cold water jar, then carefully turn it upside down and position it on top of the hot water jar, with the card separating them.
Carefully slide the card out while keeping the jars aligned. Observe what happens as the colored waters mix. The hot colored water will rise into the upper jar while the cold colored water sinks into the lower jar, creating beautiful swirling patterns as convection currents form.
Science explanation:
This spectacular experiment demonstrates density differences and resulting convection currents. Hot water is less dense than cold water, so it rises upward, while the denser cold water sinks downward. As they pass each other, they create visible currents that continue until the temperature equalizes.
This same principle explains many natural phenomena: ocean currents that distribute heat globally, atmospheric circulation that creates weather patterns, and even magma movements within Earth’s mantle. In our homes, convection drives the heating and cooling systems, hot water circulation, and many cooking processes.
This experiment offers excellent opportunities to discuss the water cycle, weather patterns, and ocean currents—all topics in the primary science curriculum. Students at Seashell Academy are encouraged to make these cross-disciplinary connections, enhancing both their understanding and retention of scientific concepts.
Learning Outcomes and PSLE Application
These kitchen-based heat transfer experiments align perfectly with the Singapore primary science curriculum and develop skills assessed in the PSLE Science examination. At Seashell Academy by Suntown Education Centre, we emphasize not just content knowledge but also the application of scientific concepts to real-world scenarios.
Through these experiments, students develop several key competencies:
- Scientific investigation skills: Students learn to make predictions, control variables, make observations, and draw conclusions—all essential scientific process skills tested in PSLE.
- Data collection and analysis: By recording times, temperatures, and observations, students practice gathering and interpreting data, a key component of the PSLE Science examination.
- Concept application: These experiments help students understand abstract concepts like conduction, convection, and radiation by seeing them in action, making the concepts more concrete and memorable.
- Critical thinking: By analyzing why different materials conduct heat differently or why convection currents form, students develop the analytical thinking skills that distinguish top PSLE performers.
At Seashell Academy, we’ve observed that students who engage in hands-on experiments demonstrate significantly better understanding and retention of scientific concepts than those who learn through textbooks alone. Our Programme Philosophy emphasizes this experiential learning approach, particularly in our science instruction.
Parents can extend these learning opportunities by encouraging children to document their experiments in a science journal, including hypotheses, observations, and conclusions. This reinforces scientific thinking and strengthens the written communication skills needed for PSLE success.
Safety Considerations
While these kitchen experiments are designed to be safe for primary school students, proper supervision and safety measures remain essential. At Seashell Academy by Suntown Education Centre, we believe that learning about safety is an important part of scientific education.
Before conducting any experiment, review these safety guidelines with your child:
- Adult supervision is required for experiments involving hot water or electrical appliances.
- Use warm water instead of boiling water when possible to prevent scalding.
- Wear heat-resistant gloves when handling hot containers or utensils.
- Keep a first aid kit nearby in case of minor accidents.
- Ensure the experiment area is clear of clutter and away from edges.
- Discuss the specific safety considerations for each experiment before beginning.
- Clean up properly after each experiment, especially if food coloring or other materials that could stain are used.
These safety practices not only protect children during experiments but also teach them responsibility and risk assessment—valuable life skills that extend beyond the science classroom.
Conclusion
Heat transfer experiments using kitchen utensils offer a perfect blend of scientific discovery and everyday relevance for primary school students. Through these hands-on activities, complex physics concepts become tangible and memorable, building a strong foundation for more advanced science learning in later years.
At Seashell Academy by Suntown Education Centre, we’ve witnessed how experiential learning transforms students’ relationship with science. When children see scientific principles at work in their own hands, curiosity flourishes and abstract concepts become concrete understanding. The kitchen laboratory approach embodies our Seashell Method—combining academic excellence with enjoyment and real-world application.
These experiments do more than teach heat transfer concepts; they nurture critical thinking, observation skills, and scientific literacy. Students learn to ask questions, make predictions, test ideas, and draw conclusions—the fundamental process of scientific inquiry that extends across all disciplines.
Parents can further enhance this learning by discussing the experiments afterward: What surprised you? What questions do you still have? Where else might we see these principles in action? These conversations strengthen comprehension and demonstrate that learning continues beyond structured activities.
We encourage families to make kitchen science a regular activity, exploring different scientific concepts through simple household materials. This approach mirrors our classroom methods in our Mathematics Programme, P4 Chinese Programme, P5 Chinese Programme, and P6 Chinese Programme, where we consistently connect abstract concepts to concrete applications.
Through kitchen science experiments, we’re not just preparing students for PSLE success—we’re nurturing lifelong learners who approach the world with curiosity, critical thinking, and scientific understanding.
Want to Nurture Your Child’s Scientific Thinking?
At Seashell Academy by Suntown Education Centre, we specialize in making complex scientific concepts accessible and engaging for primary school students. Our experienced MOE-trained educators use the unique Seashell Method to combine academic excellence with hands-on learning experiences.
Discover how our holistic approach to science education can help your child develop strong conceptual understanding while fostering a genuine love for learning.


