
Primary Science Process Skills: Understanding the TRACCER Framework for PSLE Success
December 22, 2025
Experiment Logbook Template & How to Use It: A Complete Guide for Primary Students
December 24, 2025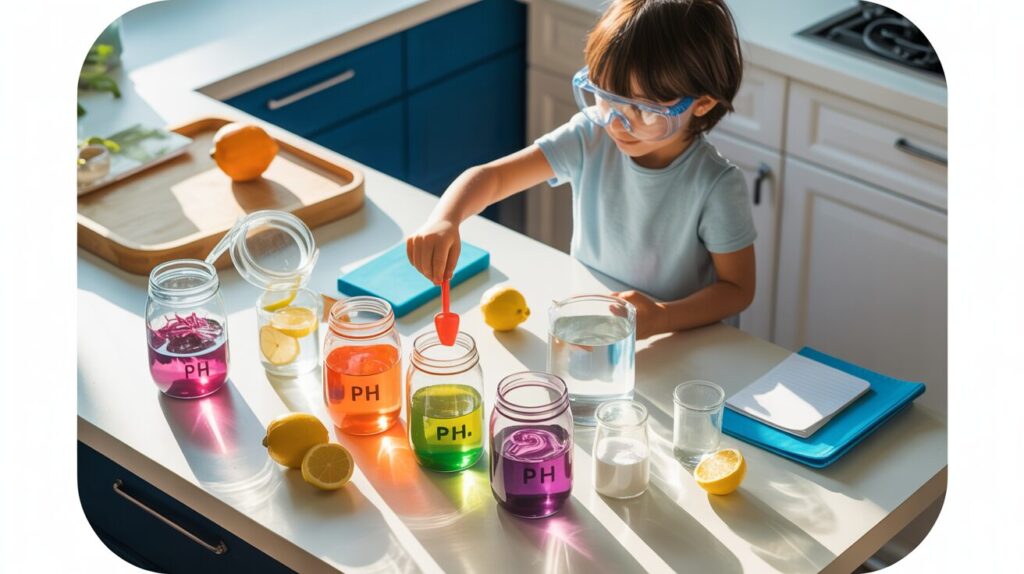
Table Of Contents
- What Are Natural pH Indicators?
- Why Natural Indicators Work: The Science Behind the Colors
- Best Natural Indicators You Can Find at Home
- Making Your Own Red Cabbage pH Indicator
- Testing Household Substances: A Fun pH Experiment
- Understanding Your Results and the pH Scale
- Connecting Natural Indicators to PSLE Science Topics
- Safety Tips for Home Science Experiments
Imagine transforming your kitchen into a vibrant science laboratory where purple cabbage juice magically changes colors, revealing the hidden properties of everyday liquids. This isn’t just an entertaining afternoon activity—it’s a powerful hands-on learning experience that brings Primary Science concepts to life in the most memorable way possible.
At Seashell Academy by Suntown Education Centre, we believe that the best learning happens when students can touch, see, and experience scientific principles firsthand. Measuring pH with natural indicators perfectly embodies our philosophy of real-life application, where abstract concepts like acids and bases transform into colorful, tangible experiments that students genuinely enjoy.
This comprehensive guide will walk you and your child through creating natural pH indicators at home, conducting fascinating experiments with common household items, and understanding the science behind those spectacular color changes. Whether you’re reinforcing classroom learning, preparing for PSLE Science topics, or simply nurturing your child’s curiosity, this activity offers the perfect blend of education and engagement that makes learning stick.
Let’s embark on this colorful scientific journey together and discover how nature provides us with remarkable tools to explore the chemistry happening all around us.
What Are Natural pH Indicators?
Natural pH indicators are substances extracted from plants that change color depending on whether they’re mixed with an acid or a base. Think of them as nature’s litmus paper—instead of using chemicals manufactured in a laboratory, we’re harnessing the color-changing compounds that plants naturally produce to protect themselves and attract pollinators.
These indicators contain special molecules called anthocyanins, which are responsible for the red, purple, and blue colors in many fruits, vegetables, and flowers. When anthocyanins encounter different pH levels, their molecular structure changes slightly, and this structural shift causes them to reflect different wavelengths of light—resulting in visible color changes that our eyes can detect.
For Primary students studying the topic of acids and bases, natural indicators offer a significant advantage over simply memorizing facts from textbooks. When your child sees lemon juice turn red cabbage indicator bright pink, or watches baking soda solution shift it to blue-green, they’re witnessing chemistry in action. This visual, hands-on experience creates lasting memories that make abstract concepts concrete and examination questions much easier to answer with confidence.
The beauty of natural indicators lies in their accessibility. You don’t need expensive laboratory equipment or hard-to-find chemicals. Everything you need is probably already in your kitchen or can be easily purchased at your neighborhood market, making this an ideal home learning activity that complements the structured learning your child receives at tuition.
Why Natural Indicators Work: The Science Behind the Colors
Understanding why natural indicators change color helps students grasp the deeper scientific principles at work—something that aligns perfectly with Seashell Academy’s approach of teaching concepts rather than just facts. The pH scale measures how acidic or alkaline (basic) a substance is, ranging from 0 to 14, with 7 being neutral.
Anthocyanins, the active compounds in natural indicators, are sensitive to the concentration of hydrogen ions (H+) in a solution. In acidic conditions (pH below 7), where hydrogen ions are abundant, anthocyanins take on a structure that reflects red and pink wavelengths of light. As the solution becomes more neutral (pH around 7), the color typically shifts to purple. In alkaline or basic conditions (pH above 7), where hydroxide ions (OH-) dominate, the molecular structure changes again, reflecting green, yellow, or even blue-yellow wavelengths.
This isn’t just academic knowledge—it connects directly to PSLE Science examination topics. Students who understand why indicators change color, rather than just memorizing that “acids turn litmus paper red,” demonstrate deeper comprehension that examiners reward with full marks on explanation questions.
The process also illustrates an important scientific principle: observation leads to understanding. When your child conducts this experiment and sees the color spectrum firsthand, they’re practicing the same investigative skills that professional chemists use daily. They’re forming hypotheses (“I think vinegar will turn the indicator pink”), testing them, and drawing conclusions based on evidence—critical thinking skills that extend far beyond science alone.
Best Natural Indicators You Can Find at Home
Nature provides us with numerous options for creating pH indicators, each offering slightly different color ranges and intensities. Here are the most effective and easily accessible natural indicators for home experiments:
Red Cabbage: This is the gold standard for home pH indicators and the one we’ll focus on in our detailed experiment. Red cabbage produces a vibrant purple solution that displays a wide range of colors across the pH spectrum—from bright pink in strong acids to yellow-green in strong bases. It’s affordable, readily available, and produces consistent, dramatic results that captivate students’ attention.
Turmeric: This common spice creates a yellow indicator that turns reddish-brown in bases and remains yellow in acids. While it offers a narrower color range than cabbage, turmeric is excellent for demonstrating the concept and is something most households already have in their kitchen.
Beetroot: The deep red pigments in beetroot create an indicator that shifts between red and yellow. It’s particularly good for demonstrating the difference between acidic and basic solutions, though the color changes are less dramatic than those produced by red cabbage.
Butterfly Pea Flowers: If you can find these beautiful blue flowers at specialty Asian markets, they produce a stunning indicator that shifts from vibrant blue in neutral/basic solutions to purple and pink in acidic conditions. The dramatic color change makes this especially engaging for younger learners.
Red Rose Petals: Dark red or purple roses contain anthocyanins that can serve as indicators. While requiring more plant material to produce a strong solution, rose petals offer an elegant variation for students interested in exploring multiple indicator sources.
For your first experiment, we strongly recommend starting with red cabbage due to its reliability, affordability, and impressive color range. Once your child masters the basic technique, exploring other indicators becomes an excellent extension activity that demonstrates how the same scientific principle applies across different plants.
Making Your Own Red Cabbage pH Indicator
Creating your own pH indicator is surprisingly simple and requires only basic kitchen equipment. This hands-on process teaches students that science doesn’t always need fancy laboratories—sometimes the most valuable learning happens in everyday environments with common materials. Here’s everything you need and the step-by-step process to create your indicator solution.
Materials You’ll Need
- Half a head of red cabbage (purple cabbage also works perfectly)
- A medium-sized pot with lid
- Water (approximately 2-3 cups)
- A strainer or colander
- A clean glass jar or bowl for storing the indicator
- Cutting board and knife (adult supervision required)
- Stove or hot plate (adult supervision required)
Step-by-Step Preparation Process
1. Prepare the cabbage – Roughly chop the red cabbage into medium-sized pieces. There’s no need for precision here; the goal is simply to break down the cabbage to release more anthocyanins into the water. Involve your child in this step if they’re old enough to safely use a knife under supervision, as the physical engagement strengthens their connection to the experiment.
2. Boil the cabbage – Place the chopped cabbage in the pot and add enough water to cover the pieces completely (usually 2-3 cups). Bring the water to a boil, then reduce the heat and let it simmer for approximately 10-15 minutes. You’ll notice the water turning a deep purple color—this is the anthocyanin pigment extracting into the liquid. The longer you simmer, the more concentrated your indicator will be.
3. Cool and strain – Turn off the heat and allow the mixture to cool for about 10 minutes. This step is crucial for safety and prevents the glass containers from cracking due to temperature shock. Once cooled, carefully strain the liquid into your storage container, separating the cabbage pieces from the purple indicator solution. The cabbage can be composted or discarded.
4. Store your indicator – Pour the purple liquid into a clean glass jar or bottle. Your indicator is now ready to use! It can be stored in the refrigerator for up to one week, though it’s best used fresh for the most vibrant color changes. If you notice the solution developing an unpleasant odor, it’s time to make a fresh batch.
This preparation process itself offers valuable learning moments. Students observe how heat affects extraction, witness the gradual color intensification, and practice following sequential procedures—all skills that connect to their mathematical thinking and scientific method understanding that we nurture at Seashell Academy.
Testing Household Substances: A Fun pH Experiment
Now comes the exciting part—testing various household substances to discover their pH levels through spectacular color transformations. This experiment transforms abstract knowledge about acids and bases into a memorable, colorful experience that Primary students will recall long after the activity ends.
Safe Household Substances to Test
Acidic substances to try:
- Lemon juice or lime juice
- White vinegar
- Orange juice
- Apple juice
- Soft drinks (cola works particularly well)
- Yogurt (diluted with a small amount of water)
Neutral substances to try:
- Distilled water or tap water
- Sugar water
- Salt water
Basic (alkaline) substances to try:
- Baking soda solution (1 teaspoon in water)
- Dish soap diluted in water
- Hand soap diluted in water
- Toothpaste mixed with water
- Antacid tablet dissolved in water
Conducting the Experiment
1. Set up your testing station – Arrange small clear cups, glasses, or bowls in rows on a table covered with newspaper or a plastic tablecloth. Label each container with the substance you’ll be testing using masking tape and a marker. This organization helps students practice systematic experimentation and makes it easier to compare results.
2. Add the test substances – Pour a small amount (about 2-3 tablespoons) of each substance into its labeled container. For powders like baking soda or crushed antacid tablets, dissolve them in water first. The goal is to have enough liquid to see a clear color change when you add the indicator.
3. Add your indicator – Pour approximately 1-2 tablespoons of your red cabbage indicator into each container. Encourage your child to observe carefully and describe what they see. The color changes should be immediate and dramatic—acids will shift the purple indicator toward pink or red, while bases will turn it blue, green, or yellow.
4. Record observations – Have your child create a simple chart documenting each substance, the color it produced, and whether they think it’s an acid, base, or neutral. This recording process reinforces scientific methodology and creates a reference they can use when studying for examinations. Taking photographs of the colorful results also provides an excellent visual study aid.
5. Make predictions and test – Before adding indicator to each substance, ask your child to predict whether it will be acidic, basic, or neutral based on their prior knowledge. This prediction step activates critical thinking and makes the reveal more engaging when they discover if their hypothesis was correct.
This hands-on investigation embodies the interactive, gamified learning approach that makes Seashell Academy’s methodology so effective. Students aren’t passively receiving information—they’re actively discovering it, which creates stronger neural pathways and deeper understanding that translates to better retention and examination performance.
Understanding Your Results and the pH Scale
After completing the colorful experiments, it’s time to interpret the results and connect them to the formal scientific concepts that appear in the Primary Science curriculum. This reflection phase transforms a fun activity into meaningful learning that supports academic success.
The pH scale ranges from 0 to 14, with each number representing a tenfold difference in acidity or alkalinity. Your red cabbage indicator reveals this scale through its color spectrum:
pH 2-4 (Strong to Moderate Acids): Bright pink to reddish colors. Substances like lemon juice and vinegar fall into this category. These acids taste sour and can feel slightly stinging on cuts. In the body, stomach acid is extremely acidic (around pH 2) to help digest food.
pH 5-6 (Weak Acids): Purple to violet colors. Many fruit juices and soft drinks fall here. While still acidic, these are milder and less reactive than strong acids.
pH 7 (Neutral): Purple to blue-purple. Pure water sits at this neutral point, containing equal amounts of hydrogen and hydroxide ions. This is the reference point from which we measure acidity and alkalinity.
pH 8-10 (Weak to Moderate Bases): Blue to blue-green colors. Baking soda solution and many soaps fall into this range. These substances feel slippery to touch and can neutralize acids.
pH 11-14 (Strong Bases): Green to yellow-green colors. While you shouldn’t test these at home without proper safety equipment, strong bases like ammonia and drain cleaners would produce these colors. They’re corrosive and require careful handling.
Help your child understand that acids and bases are opposites that can neutralize each other—a concept that appears regularly in PSLE Science questions. When you mix an acid with a base in the right proportions, they create a neutral solution and often produce salt and water. This is why antacid tablets (a base) help settle upset stomachs caused by excess stomach acid.
Encourage your child to think about real-world applications: Why do we use acidic lemon juice to remove stains? Why does basic soap clean better than just water? Why do we add lime (a base) to acidic soil in gardens? These connections between experiments and everyday life mirror the teaching philosophy at Seashell Academy, where we emphasize that science isn’t confined to textbooks—it’s everywhere around us, waiting to be understood and applied.
Connecting Natural Indicators to PSLE Science Topics
The natural indicator experiment directly supports several key learning objectives in the Primary Science syllabus, particularly for Primary 5 and 6 students preparing for PSLE examinations. Understanding these connections helps parents recognize the educational value of hands-on activities and enables students to make explicit links between experiments and examination questions.
The Acids and Bases topic is explicitly covered in upper primary science, where students must understand the properties of acids and bases, how to identify them using indicators, and their applications in daily life. Your home experiment provides concrete examples that make abstract examination questions much more approachable. When a PSLE question asks, “What color will litmus paper turn in an acidic solution?” students who’ve watched red cabbage indicator turn pink in lemon juice have a mental image to reference, making recall faster and more reliable.
Beyond specific content knowledge, this experiment develops experimental skills that examiners assess through practical questions and methodology-based items. Students practice making observations, recording data systematically, identifying variables (what changes and what stays the same), and drawing conclusions from evidence. These process skills are increasingly emphasized in modern science education and carry significant marks in examinations.
The activity also reinforces classification skills—sorting substances into categories based on their properties. This fundamental scientific thinking skill appears across multiple topics, from classifying materials and living things to categorizing forces and energy types. When your child groups tested substances into acids, bases, and neutral solutions, they’re practicing the same cognitive skill needed for many examination questions.
At Seashell Academy, our learning approach emphasizes these connections between hands-on discovery and examination success. We’ve found that students who engage with science practically at home, then work through targeted practice questions in our structured classes, demonstrate significantly stronger understanding and confidence. The experiment provides the foundation; our experienced MOE-trained educators build upon that foundation with focused instruction that transforms curiosity into mastery.
For students in our programmes, this natural indicator experiment serves as an excellent preparation or reinforcement activity. Parents of students in our Primary 4-6 Science classes can use this experiment to preview upcoming acid-base topics or to provide additional practice that complements classroom learning, creating the kind of multi-layered exposure that leads to deep, lasting comprehension.
Safety Tips for Home Science Experiments
While the natural indicator experiment is generally safe and uses household items, establishing good safety habits during home science activities teaches children important lessons about responsible experimentation. These practices also reflect the careful, structured approach that Seashell Academy emphasizes in all learning activities—where enthusiasm for discovery is balanced with mindful attention to proper procedures.
Adult supervision is essential: Parents should actively participate in the experiment, particularly during the preparation phase involving boiling water and sharp knives. This supervision isn’t just about preventing accidents—it’s an opportunity to model scientific thinking and ask guiding questions that deepen learning.
Clearly label all containers: Even though you’re using familiar household items, proper labeling prevents confusion and teaches students that scientists always clearly identify their materials. This habit becomes crucial if students later participate in science competitions or conduct more complex experiments.
Test only safe, known substances: Resist the temptation to test unknown chemicals or substances from unlabeled containers. Stick to the household items listed in this guide, which are all safe for testing. This teaches children that scientific curiosity must be balanced with caution and informed decision-making.
Avoid ingestion: Even though most substances being tested are food items, once mixed with indicator solution or exposed to experimentation, they should not be consumed. Establish this rule clearly before beginning the activity.
Protect surfaces and clothing: Red cabbage indicator can stain surfaces and fabrics. Use a covered workspace and consider having your child wear an old shirt or apron. If spills occur, clean them promptly with soap and water.
Wash hands thoroughly: After completing the experiment, ensure your child washes their hands with soap and water, even though the materials used are relatively harmless. This reinforces good laboratory hygiene that will serve them well in future scientific endeavors.
Proper disposal: Most tested solutions can be safely poured down the drain with running water. Dispose of solid materials appropriately and clean all containers thoroughly after use.
These safety practices align with Seashell Academy’s holistic approach to education, where we teach not just academic content but also responsibility, careful thinking, and mindful behavior. When students learn to approach experiments with both enthusiasm and caution, they’re developing maturity and judgment that extends far beyond the science curriculum.
Measuring pH with natural indicators transforms science from an abstract subject into a vibrant, hands-on adventure that Primary students genuinely enjoy. When your child watches a simple cabbage solution shift through a rainbow of colors, revealing the hidden properties of everyday substances, they’re not just completing an activity—they’re experiencing the wonder that makes science fascinating and developing the investigative skills that lead to academic excellence.
This experiment embodies everything that makes learning effective: it’s interactive, visually engaging, connected to real-world applications, and builds genuine understanding rather than rote memorization. The confidence your child gains from successfully conducting a scientific investigation, making predictions, and drawing evidence-based conclusions extends well beyond this single activity. It nurtures the kind of curious, resilient learner who approaches challenges with enthusiasm rather than anxiety.
At Seashell Academy by Suntown Education Centre, we believe that sustainable academic success comes from this combination of hands-on discovery, structured guidance, and genuine understanding. While home experiments like this one spark curiosity and provide valuable practical experience, pairing them with expert instruction creates the comprehensive learning environment where students truly thrive. Our experienced MOE-trained educators know exactly how to build upon the foundation that activities like this create, connecting hands-on discovery to examination success through our proven Seashell Method.
Whether your child is preparing for PSLE Science, strengthening their conceptual understanding, or simply exploring the fascinating world of chemistry, natural indicator experiments offer lasting educational value wrapped in colorful, memorable fun. The purple cabbage solution sitting in your refrigerator isn’t just an indicator—it’s a gateway to deeper learning, scientific thinking, and the kind of academic confidence that carries students through examinations and beyond.
Help Your Child Transform Curiosity Into Academic Excellence
Home experiments spark wonder, but structured guidance transforms that wonder into mastery. At Seashell Academy by Suntown Education Centre, our experienced MOE-trained educators use proven methods to build deep understanding that leads to confident PSLE performance. Discover how our holistic approach nurtures both academic excellence and genuine love for learning.


