
Complete Plant Diversity Field-Trip Guide for Primary School Students
October 24, 2025
PSLE Science Answering Techniques: Mastering Open-Ended Questions
October 26, 2025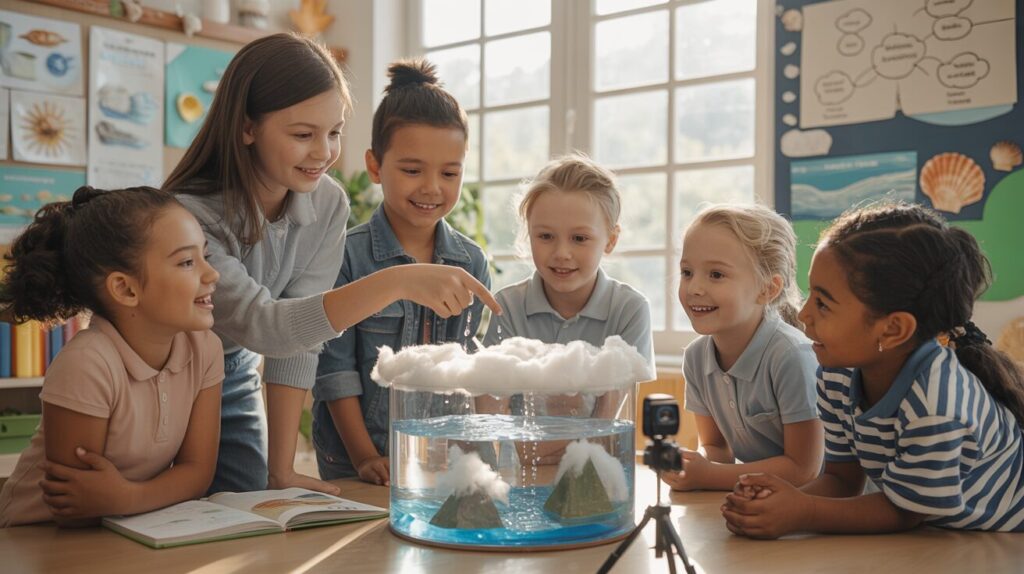
Table Of Contents
- Introduction to the Water Cycle Project
- Benefits of Building a Water Cycle Model
- Materials Needed for Your Water Cycle Model
- Step-by-Step Video Guide
- Written Instructions for Building Your Water Cycle Model
- The Science Explained: Understanding the Water Cycle
- Teaching Tips for Parents and Educators
- Common Questions About Water Cycle Models
- Conclusion
Build a Water-Cycle Model: Step-by-Step Video Guide for Primary School Science
The water cycle is one of the most fascinating natural processes that primary school students learn about in their science curriculum. At Seashell Academy by Suntown Education Centre, we believe that hands-on learning creates deeper understanding and more meaningful connections to scientific concepts. Building a water cycle model allows children to visualize evaporation, condensation, and precipitation in action—transforming abstract concepts into tangible experiences.
Our step-by-step video guide will walk you and your child through creating an engaging water cycle model that demonstrates how water continuously moves through our environment. This project is perfect for Primary 3-6 students studying the water cycle in their science syllabus, but can be enjoyed by younger students as well with parental guidance. Let’s embark on this scientific journey together and bring the water cycle to life in your own home!
Benefits of Building a Water Cycle Model
Creating a water cycle model with your child offers numerous educational and developmental advantages that align perfectly with the holistic learning approach we champion at Seashell Academy by Suntown Education Centre. Here’s why this hands-on science project is worth your time:
Reinforces Scientific Concepts – Unlike simply memorizing definitions from textbooks, building a physical model helps students truly understand how water moves through different states in nature. This concrete demonstration makes abstract scientific processes tangible and memorable.
Develops Critical Thinking Skills – Throughout the building process, children will naturally ask questions, make predictions, and draw conclusions based on their observations. These inquiry-based thinking patterns are essential for developing scientific mindsets.
Encourages Parent-Child Bonding – Working together on this project creates a shared learning experience that strengthens your relationship while demonstrating the value of education. These moments of discovery and accomplishment become cherished memories.
Builds Confidence in Science – When children successfully complete a science project and understand the principles behind it, they develop confidence in their ability to comprehend scientific concepts. This confidence often extends to other academic areas as well.
Creates Real-World Connections – The water cycle isn’t just a concept in a textbook—it’s happening all around us every day. This model helps students connect classroom learning with the natural world they observe outside.
Materials Needed for Your Water Cycle Model
Before diving into the construction of your water cycle model, gather all the necessary materials. Having everything prepared beforehand will make the process smoother and more enjoyable for both you and your child.
For this project, you’ll need:
Basic Materials:
- A large, clear plastic container with a lid (a plastic shoebox or similar container works perfectly)
- Small rocks and pebbles of various sizes
- Potting soil or sand
- Small plants or moss (optional, for aesthetic purposes)
- Blue food coloring
- Water
- Plastic wrap (if your container doesn’t have a transparent lid)
- Rubber band (to secure plastic wrap if needed)
- Small, heavy object (to create a depression in the plastic wrap if used)
Optional Enhancement Materials:
- Small toy trees or houses for creating a landscape scene
- A small mirror (to represent a lake)
- A spray bottle filled with water (to create “rain”)
- A small desk lamp (to represent the sun and accelerate evaporation)
- Colored markers for labeling parts of the water cycle on the container
Most of these materials are likely already in your home, or can be easily obtained from local craft stores or garden centers. The beauty of this project is its flexibility—you can adjust the materials based on what you have available, making it an accessible activity for all families.
Step-by-Step Video Guide
Our comprehensive video guide walks you through each step of creating your water cycle model. By following along with our demonstration, both parents and students can easily construct an effective model that clearly demonstrates the water cycle process.
The video covers everything from setting up your container to observing the completed water cycle in action. We’ve broken down complex scientific principles into simple, easy-to-follow instructions suitable for primary school students.
For the best learning experience, we recommend watching the full video before starting your project. This preview will give you a clear understanding of the entire process and allow you to prepare accordingly. Then, as you build your own model, you can follow along with the video at your own pace, pausing when needed to complete each step thoroughly.
Our video guide also includes helpful tips and explanations about what’s happening at each stage of the water cycle, enhancing the educational value of this hands-on activity. The clear visual demonstrations make it easy for visual learners to understand the process.
If you encounter any questions or challenges while following the video, remember that our teachers at Seashell Academy’s Mathematics Programme are always available to provide additional guidance and support for science-related projects.
Written Instructions for Building Your Water Cycle Model
In addition to our video guide, we’ve provided detailed written instructions for building your water cycle model. These step-by-step directions can be used alongside the video or as a standalone guide.
Step 1: Preparing Your Container
Begin by thoroughly cleaning your plastic container to remove any dirt or residue. This ensures a clear view of the water cycle in action. If your container doesn’t have a transparent lid, you’ll need to use plastic wrap later in the process.
Position your container in a location where it can remain undisturbed for several days. Ideally, this should be a spot that receives some sunlight but isn’t in direct sunlight all day, as excessive heat can create condensation too quickly.
Before adding any materials, you might want to mark one side of the container with a water-resistant marker to indicate the different stages of the water cycle: evaporation, condensation, and precipitation. This creates a useful reference point for discussions with your child.
Step 2: Creating the Landscape
Pour the rocks and pebbles into one side of the container, creating a sloped surface that rises from the bottom to about halfway up the side of the container. This slope represents the land in your water cycle model.
Next, add a layer of soil or sand on top of the rocks, covering about half of the rock surface. Shape the soil to create hills and valleys, simulating a natural landscape. If you’re using small plants or moss, now is the time to plant them in the soil.
For added visual interest, you can position toy trees, houses, or other miniature objects on your landscape. These elements not only make the model more engaging for children but also provide a sense of scale that helps them understand how the water cycle affects our environment.
If you’re using a small mirror, place it in a depression in the soil to represent a lake or pond. Position it so that it will be visible from outside the container when the project is complete.
Step 3: Adding Water and Creating the Sea
Carefully pour water into the empty side of the container, opposite the landscape you’ve created. Add enough water to fill about one-quarter to one-third of the container’s height. The water should not flood your landscape but should come up to the edge of your rock and soil formation.
Add a few drops of blue food coloring to the water and stir gently with a spoon or stick. This coloring helps distinguish the water from the rest of the model and makes the water cycle process more visible.
As you add the water, take this opportunity to explain to your child that this represents the ocean or a large body of water in our environment. You can discuss how most of Earth’s water is found in oceans and seas, establishing the starting point for the water cycle.
Step 4: Setting Up the Model for Observation
If your container has a transparent lid, secure it tightly. If not, stretch plastic wrap over the top of the container and secure it with a rubber band. The plastic wrap should be taut but not too tight—it needs to be able to collect and hold water droplets.
If you’re using plastic wrap, place a small, heavy object (like a marble or small stone) in the center of the wrap, directly above the “land” portion of your model. This creates a slight depression where condensed water droplets can collect before “raining” down onto the landscape.
Place your completed model in a location where it will receive some sunlight. The sun’s heat will warm the water, initiating the evaporation process. A small desk lamp can supplement natural sunlight if needed.
Now, the most exciting part begins—observation! Check on your model several times throughout the day and discuss the changes you observe with your child. Within hours, you should start to see water droplets forming on the underside of the lid or plastic wrap.
The Science Explained: Understanding the Water Cycle
As you observe your water cycle model with your child, take the opportunity to explain the scientific processes taking place. At Seashell Academy by Suntown Education Centre, we believe that understanding the “why” behind phenomena is just as important as observing the “what.”
Evaporation: The water in your model (representing oceans, lakes, and rivers) is warmed by the sun (or lamp). This warming causes water molecules to become energized and transform from a liquid state into a gas state, creating water vapor that rises into the air. In your model, you can’t see this vapor, but it’s moving upward toward the lid or plastic wrap. This process of liquid water changing to water vapor is called evaporation.
Condensation: As the water vapor rises, it reaches the plastic lid or wrap, which is cooler than the air inside the container. When water vapor touches this cooler surface, it loses energy and transforms back into a liquid state, forming small water droplets on the underside of the lid or wrap. This process of water vapor changing back to liquid water is called condensation—the same process that creates clouds in our sky.
Precipitation: As more and more water condenses on the lid or plastic wrap, the water droplets grow larger and heavier. Eventually, they become too heavy to stay attached to the surface and fall back down as “rain” onto the landscape below. This represents precipitation in the natural water cycle, which includes rain, snow, sleet, and hail.
Collection: The water that falls as “rain” in your model either soaks into the soil (infiltration) or runs down the slope into the “ocean” (runoff). Both of these processes represent how water is collected in various bodies and forms in nature, completing the cycle so it can begin again.
By observing this continuous process over several days, your child will develop a deeper understanding of how water is constantly recycled in our environment. This hands-on experience reinforces the concept that the water we use today has been cycling through Earth’s systems for millions of years—an important perspective on conservation and our planet’s natural resources.
For students interested in further exploration, our Programme Philosophy at Seashell Academy encourages connecting this learning to real-world applications, such as understanding how the water cycle affects weather patterns, agriculture, and water availability in different regions of the world.
Teaching Tips for Parents and Educators
Maximize the educational value of this water cycle model project with these teaching strategies that align with our holistic approach at Seashell Academy by Suntown Education Centre:
Ask Open-Ended Questions – Instead of simply explaining everything to your child, prompt their thinking with questions like: “What do you think will happen to the water when the sun shines on it?” or “Why do you think water droplets are forming on the lid?” This encourages critical thinking and allows children to develop their own understanding.
Keep a Science Journal – Have your child document their observations in a simple journal. They can draw pictures of the model at different stages and write or dictate their observations and questions. This reinforces scientific methodology and improves documentation skills, which are essential for success in Primary 4-6 Science.
Make Real-World Connections – When it rains outside, remind your child of the water cycle model and ask them to explain what’s happening in the sky using the concepts they’ve learned. These connections between classroom learning and real-world phenomena strengthen understanding.
Extend the Learning – For older primary students, introduce vocabulary terms like “transpiration” (the release of water vapor from plants) and “groundwater” (water stored underground in soil and rock). You can also discuss how humans impact the water cycle through activities like deforestation or dam construction.
Be Patient with the Process – Sometimes the water cycle in your model might work more slowly than expected, especially if the room is cool. Use this as an opportunity to discuss how variables like temperature affect the water cycle’s speed—a valuable lesson in scientific thinking.
At Seashell Academy, our experienced educators incorporate these types of hands-on learning experiences into our Mathematics Programme, making connections between math concepts and science applications. Our approach fosters not just academic understanding but also a genuine curiosity about how our world works.
Common Questions About Water Cycle Models
As children engage with their water cycle models, they often develop thoughtful questions that demonstrate their growing scientific curiosity. Here are answers to some common questions that might arise during this project:
Q: How long will it take to see the water cycle in action?
A: You should begin to see condensation forming on the lid within a few hours, especially if the model is placed in a warm location. The complete cycle with visible “rainfall” may take 24-48 hours to observe. This is actually faster than the natural water cycle, which can take days or weeks to complete.
Q: Why did we add food coloring to the water?
A: The blue food coloring helps us track the water’s movement through the cycle. Interestingly, when the water evaporates, the coloring stays behind, and the water droplets that condense on the lid are clear. This demonstrates that evaporation purifies water, leaving impurities behind—the same process that creates fresh water from salt water in nature.
Q: What happens if no water droplets form on the lid?
A: If you don’t see condensation forming, your model might need more warmth to increase evaporation. Try placing it in a warmer location or using a desk lamp to provide additional heat. Also, ensure that your container is sealed properly to trap the moisture inside.
Q: Why does water cycle through Earth instead of just floating away into space?
A: This excellent question touches on physics! Earth’s gravity pulls water molecules back toward the planet’s surface, preventing them from escaping into space. Additionally, our atmosphere acts as a boundary that contains water vapor. Without gravity and our atmosphere, Earth would lose its water over time.
Q: Do plants play a role in the water cycle?
A: Yes, plants are active participants in the water cycle through a process called transpiration. Plants absorb water through their roots and release water vapor through tiny pores in their leaves. This plant-based evaporation contributes significantly to the moisture in our atmosphere. If you included small plants in your model, you’re also demonstrating transpiration!
These types of questions demonstrate the kind of critical thinking and curiosity we nurture in our students at Seashell Academy by Suntown Education Centre. Our Programme Philosophy encourages students to ask questions and seek deeper understanding of the world around them.
Conclusion
Building a water cycle model is more than just a science project—it’s an opportunity to witness one of nature’s most essential processes in action. Through this hands-on experience, your child has gained valuable insights into how water continuously moves through our environment, sustaining all life on Earth.
This project exemplifies the learning approach we champion at Seashell Academy by Suntown Education Centre, where we believe that true understanding comes from engaging multiple senses and connecting abstract concepts to tangible experiences. By observing the water cycle firsthand, students develop not only scientific knowledge but also a deeper appreciation for the natural world.
The skills developed through this activity—observation, prediction, documentation, and analysis—extend far beyond science class. These are the foundational thinking skills that support success across all academic subjects, including our P4 Chinese Programme, P5 Chinese Programme, and P6 Chinese Programme.
We encourage you to extend this learning by discussing water conservation and the importance of protecting our planet’s water resources. Help your child understand that the same water has been cycling through Earth’s systems for millions of years—the water in their model might once have been drunk by a dinosaur or formed part of an ancient ocean!
At Seashell Academy, we’re committed to nurturing not just academically proficient students, but thoughtful, curious individuals who understand their connection to the world around them. Simple projects like this water cycle model help us achieve that vision, one discovery at a time.
Looking for More Engaging Learning Experiences?
At Seashell Academy by Suntown Education Centre, we specialize in creating learning environments where students thrive academically while developing a genuine love for learning. Our small classes, experienced MOE-trained educators, and unique Seashell Method combine academic excellence with emotional well-being.
Whether your child needs support in Chinese, Mathematics, or Science, our personalized coaching approach ensures sustainable growth without burnout.
Contact us today to learn more about our programmes or to schedule a visit!


