
Exploring Heat Transfer Experiments With Kitchen Utensils: Science Learning Made Fun
December 13, 2025
Adaptations in Mangrove Plants: Comprehensive Illustrated Guide for Primary Students
December 15, 2025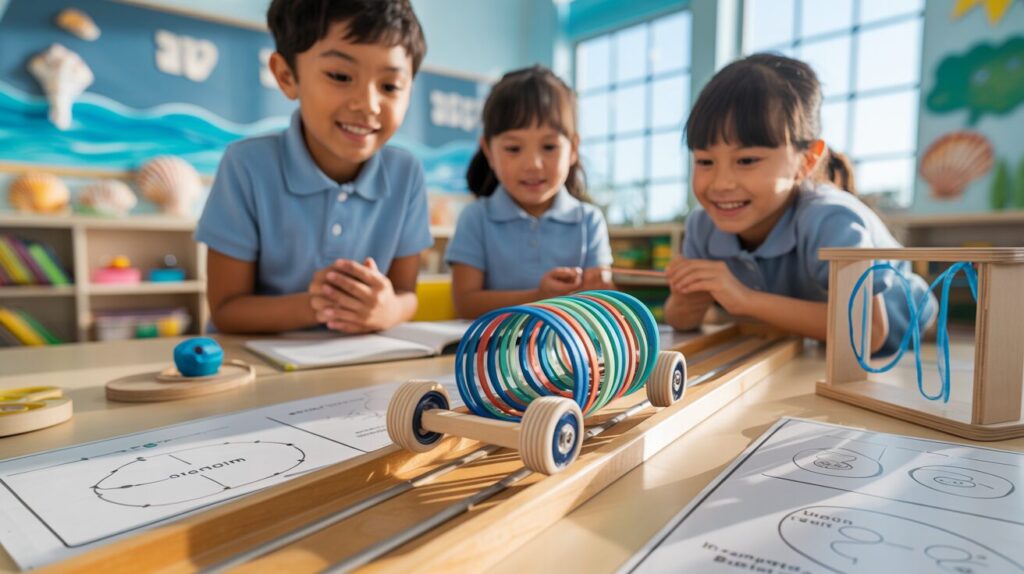
Table Of Contents
Energy conversion is a fundamental concept in primary school science education, yet it can sometimes feel abstract to young learners. At Seashell Academy by Suntown Education Centre, we believe that hands-on projects create meaningful learning experiences that transform theoretical concepts into practical understanding. Our rubber band car project offers the perfect opportunity for students to witness energy conversion in action while developing critical thinking and problem-solving skills.
This comprehensive tutorial will guide you through creating a simple yet effective rubber band-powered car, demonstrating how potential energy stored in a rubber band can convert to kinetic energy that propels the vehicle forward. Whether you’re a parent supporting your child’s learning journey or a student looking for an exciting science project, this step-by-step guide embraces the Seashell Method of combining academic excellence with joyful discovery.
Let’s embark on this educational adventure that brings science to life through creative engineering!
Rubber Band Car: Energy Conversion in Action
A hands-on project that demonstrates potential to kinetic energy transformation
The Science Behind It
Potential Energy
Stored in the twisted rubber band
Kinetic Energy
Converted from potential energy when released
Mechanical Energy
Transfers through the car’s components
Materials You’ll Need
Structure
- Cardboard rectangle (10×15cm)
- Plastic straw pieces
- Wooden skewers/dowels
Wheels & Power
- 4 bottle caps for wheels
- 4-5 rubber bands
- Glue gun and glue sticks
Tools
- Scissors
- Ruler
- Pencil
Building Your Rubber Band Car
Prepare the Chassis
Cut a 10×15cm cardboard rectangle. Mark lines 2cm from each end for axle placement.
Create Axle Holders
Cut straw pieces (2-3cm) and glue them parallel to each other on the underside of the cardboard.
Assemble Wheels
Poke holes in bottle caps, insert skewers through straws, and attach wheels to the axles.
Add Power Mechanism
Make a notch in one axle, attach a rubber band, and secure the other end near the front axle.
Experiment & Learn
Variables to Test
- Different rubber bands
- Wheel sizes
- Surface types
- Chassis weight
Troubleshooting
- Check for wheel alignment
- Reduce axle friction
- Adjust rubber band tension
- Ensure parallel axles
Learning Extensions
- Calculate car speed
- Graph performance data
- Study friction effects
- Create design journals
Key Learning Outcomes
Science Concepts
Energy conversion, friction, mechanical systems
Practical Skills
Fine motor skills, measurement, construction
Thinking Skills
Problem-solving, critical thinking, analysis
Learning Objectives
Before diving into our rubber band car project, it’s important to understand the educational goals behind this hands-on activity. At Seashell Academy, we design our learning experiences to develop multiple skills simultaneously. Through this project, students will:
Understand the concept of energy transformation from potential to kinetic energy
Develop fine motor skills through assembling the car components
Practice measurement and precision in construction
Engage in the engineering design process
Learn to observe, record, and analyze experimental results
Apply scientific principles to real-world challenges
Develop resilience through testing and improving their design
These objectives align perfectly with our Programme Philosophy at Seashell Academy, where we emphasize the practical application of knowledge alongside theoretical understanding.
Materials Needed
One of the beautiful aspects of this project is its accessibility. Most materials can be found around the home or purchased inexpensively. Gathering all supplies before beginning will make the construction process smoother and more enjoyable for your young scientist.
For your rubber band car, you’ll need:
Essential Materials:
4 bottle caps or small wheels (plastic bottle caps work well)
2 wooden skewers or thin dowels (for axles)
Cardboard rectangle (approximately 10cm x 15cm for the chassis)
4-5 rubber bands (different sizes for testing)
1 plastic straw (cut into 2-3cm sections to hold axles)
Scissors
Glue gun with glue sticks (adult supervision required)
Ruler
Pencil
Optional Materials for Enhancements:
Colorful markers or paint for decoration
Additional cardboard for car body design
Tape measure for distance testing
Stopwatch for speed calculations
Notebook for recording observations
Having these materials organized beforehand will help students focus on the learning process rather than searching for supplies. This preparation reflects our structured approach to learning at Seashell Academy, where we create organized environments that support concentration and discovery.
Scientific Principles Behind Rubber Band Cars
Before constructing our rubber band car, let’s explore the fascinating science that makes it work. This understanding forms the foundation of our project and connects hands-on learning with conceptual knowledge – a cornerstone of our teaching approach in our Mathematics Programme and science education at Seashell Academy.
Energy Transformation
The rubber band car demonstrates several forms of energy conversion:
Potential Energy: When you wind the rubber band by turning the wheels, you’re storing potential energy in the twisted rubber band. This is similar to stretching a spring – the more you twist, the more energy is stored.
Kinetic Energy: When released, the potential energy converts to kinetic energy – the energy of motion – causing the wheels to turn and the car to move forward.
Mechanical Energy: The energy transfers through the mechanical system of the car – from the rubber band to the axle to the wheels and finally to the motion of the entire vehicle.
Physics Concepts in Action
This simple car also demonstrates several important physics concepts:
Torque: The twisting force applied to the axle by the rubber band
Friction: The resistance between the wheels and the surface, which affects how far the car will travel
Rotational Motion: The wheels’ spinning movement that translates to linear motion of the car
Conservation of Energy: The principle that energy cannot be created or destroyed, only transformed from one form to another
Understanding these principles helps students connect classroom learning with real-world applications. This connection is essential for deeper comprehension and retention of scientific concepts, which is why at Seashell Academy, we emphasize learning through discovery and application.
Step-by-Step Building Guide
Now that we understand the science behind our rubber band car, let’s begin the construction process. These instructions are designed to be clear enough for primary school students to follow with minimal adult assistance, fostering independence and confidence – values we nurture in all our programmes at Seashell Academy.
Preparing the Chassis
1. Using your ruler and pencil, measure and cut out a rectangle of cardboard approximately 10cm × 15cm. This will serve as the base of your car.
2. About 2cm from each end of the cardboard, draw a straight line across the width. These marks will help you align your axle holders.
3. Cut two 2-3cm pieces from the straw. These will hold your axles in place.
4. Using the hot glue gun (with adult supervision), attach these straw pieces to the underside of your cardboard along the lines you’ve drawn. Make sure they’re perfectly parallel to each other and centered on the cardboard to ensure your car will travel straight.
Creating the Axle and Wheel System
5. Push a wooden skewer (axle) through each of the straw sections. These should be able to rotate freely within the straws.
6. For each bottle cap wheel, carefully poke or drill a small hole through the center. The hole should be just large enough for the skewer to fit snugly.
7. Slide two bottle cap wheels onto each end of the skewers. Ensure they’re pushed firmly onto the axles but can still rotate. You might need to secure them with a small dab of glue.
8. Trim any excess length from the skewers, leaving about 1cm extending beyond each wheel for safety.
Adding the Rubber Band Mechanism
9. Make a small notch in the middle of one axle. This will help secure the rubber band.
10. Hook one end of a rubber band onto this notch.
11. Stretch the rubber band along the length of the chassis toward the other axle.
12. Secure the free end of the rubber band to the chassis near the front axle using a small piece of tape or by poking a hole in the cardboard and threading it through.
Testing and Winding
13. Hold the car with the wheels touching a flat surface.
14. Wind up the rear axle by turning the wheels backward several times. This will twist the rubber band and store potential energy.
15. Place the car on the floor or table and release it to watch it zoom forward!
This hands-on construction process incorporates multiple skills, from precise measurement to understanding mechanical systems – exactly the kind of integrated learning experience we provide in our P4 Chinese Programme, P5 Chinese Programme, and P6 Chinese Programme, where language learning connects with practical applications.
Testing and Modifications
Once your rubber band car is built, the real scientific exploration begins! At Seashell Academy, we encourage students to approach learning as an ongoing process of inquiry and refinement. This testing phase is where deeper learning occurs as students observe, analyze, and improve their designs.
Initial Testing
Begin by testing your car on a smooth, flat surface. Observe how it performs and consider these questions:
How far does the car travel?
Does it move in a straight line?
How many winds of the rubber band provide the best performance?
What happens if you use different sized rubber bands?
Recording these observations in a notebook helps students develop scientific documentation skills and critical thinking abilities.
Variables to Experiment With
Like true scientists, students can modify different aspects of their cars to see how performance changes. Consider experimenting with:
Rubber Band Variations: Try thicker, thinner, longer, or shorter rubber bands. How does each affect the car’s speed and distance?
Wheel Size: Test different sized bottle caps or other materials for wheels. Do larger wheels travel farther? Do smoother wheels reduce friction?
Chassis Weight: Add small weights to different parts of the car. How does this affect stability and distance?
Surface Types: Test the car on various surfaces like wood, tile, or carpet. Which surface allows the car to travel farthest?
This experimental process mirrors our approach at Seashell Academy, where we encourage students to test assumptions, make adjustments, and develop deeper understanding through active learning.
Troubleshooting Common Issues
Even the most carefully constructed rubber band cars can encounter problems. Learning to identify and solve these issues is an important part of the engineering process and helps develop resilience – a quality we nurture in all Seashell Academy students.
Car Doesn’t Move or Moves Slowly
Possible Causes and Solutions:
Friction in the Axles: Make sure the skewers can rotate freely in the straw sections. If they’re too tight, try using a slightly thinner skewer or a wider straw.
Wheel Alignment: Check that your wheels are properly aligned and securely attached to the axles. Wobbly or misaligned wheels create friction that slows the car.
Rubber Band Tension: The rubber band might be too loose or too tight. Try using a different size rubber band or adjusting how it’s attached.
Car Doesn’t Travel Straight
Possible Causes and Solutions:
Uneven Axle Placement: Make sure your straw sections are exactly parallel to each other and perpendicular to the direction of travel.
Uneven Wheels: Check that all wheels are the same size and are attached at the same position on each axle.
Chassis Warping: If your cardboard is bending, reinforce it with additional cardboard strips or use a stiffer material.
Learning to diagnose and fix these issues helps students develop analytical thinking and problem-solving skills – core competencies we foster through our Seashell Method of teaching.
Educational Extensions and Activities
The rubber band car project offers numerous opportunities to extend learning across multiple subjects. At Seashell Academy by Suntown Education Centre, we value cross-disciplinary connections that deepen understanding and make learning more meaningful.
Mathematics Extensions
Speed Calculations: Measure how far the car travels and how long it takes. Then calculate speed using the formula: speed = distance ÷ time.
Data Collection and Graphing: Record the results of different trials and create bar graphs or line graphs to visualize how modifications affect performance.
Geometry Applications: Explore concepts of parallel lines, perpendicular lines, and angles in the construction of the car.
These mathematical applications complement our Mathematics Programme, where we emphasize practical applications of mathematical concepts.
Science Extensions
Energy Transformation Diagram: Create a visual representation showing how energy changes form throughout the car’s operation.
Friction Investigation: Design experiments to test how different surfaces affect the car’s performance, exploring the concept of friction more deeply.
Material Science: Test different materials for wheels, axles, or chassis to explore properties like rigidity, elasticity, and durability.
Language Arts Connections
Technical Writing: Write detailed instructions for building the car, practicing clarity and sequential organization.
Reflective Journal: Keep a scientist’s journal documenting the building process, challenges encountered, and solutions discovered.
Persuasive Writing: Create an advertisement explaining why your car design is the best, using evidence from your testing.
These language activities connect beautifully with skills developed in our P4 Chinese Programme, P5 Chinese Programme, and P6 Chinese Programme, where communication skills are taught in meaningful contexts.
By extending the project across multiple subject areas, students gain a more holistic understanding of concepts and see how different fields of knowledge connect – a core principle of the Seashell Method of education.
Conclusion
The rubber band car project represents far more than a simple science activity – it embodies the educational philosophy we champion at Seashell Academy by Suntown Education Centre. Through this hands-on exploration of energy conversion, students have engaged with scientific principles in a tangible, memorable way that promotes deeper understanding and genuine curiosity.
This project demonstrates how theoretical concepts like potential and kinetic energy transform from abstract ideas into observable phenomena. Students don’t just learn about energy conversion; they witness it, measure it, and manipulate it through their own creations. This experiential learning approach is central to our Seashell Method, where we believe that meaningful engagement leads to lasting comprehension.
Beyond science concepts, building a rubber band car develops crucial skills that extend across all academic areas: problem-solving when cars don’t perform as expected, critical thinking when analyzing results, creativity when designing modifications, and persistence when refining designs. These transferable skills support students not just in science class but throughout their educational journey and beyond.
We encourage parents and students to continue exploring energy conversion through additional projects and investigations. The foundations built through this activity create a springboard for deeper scientific inquiry and discovery – exactly the kind of sustainable, joyful learning we nurture at Seashell Academy.
Experience the Seashell Method of Learning
At Seashell Academy by Suntown Education Centre, we integrate hands-on learning experiences like the rubber band car project into our comprehensive curriculum. Our approach balances academic excellence with joyful discovery, nurturing students who not only perform well in examinations but develop a genuine love for learning.
Would you like your child to experience education that connects theoretical concepts with real-world applications? We invite you to learn more about our personalized approach to primary education.
Contact us today to schedule a consultation or learn more about our programmes:


